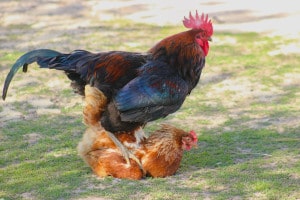
These tips are applicable to eggs from poultry or similar bird species.
Content
Tip 1 – The preparation
It is important to be aware of how you are proceeding ahead of time.
Therefore, you should prepare or dispose of the following things:
Rearing box:
The nursery is your home for your chicks for the first 2 to 3 weeks until they need to be relocated to a larger enclosure.
Which is why you should take care in advance to have already selected the pitch and get all the utensils as soon as possible, so that you can finish the rearing box.
A decent nursery for the chicks will ensure that they grow up healthy.
Incubator:
The incubator is half the battle.
Before you start incubating, the incubator should be prepared.
Disinfect and clean the incubator.
Nothing can be worse if your complete set of hatching eggs are contaminated with bacteria, fungi and other germs during the incubation process.
Check the function of the incubator.
Pre-run the incubator for 1-2 days and bring it to incubation temperature.
This way you can approximately ensure that the incubator also works flawlessly.
It is best to always have another incubator on reserve.
Having two incubators also has the advantage that you can use the second one only for hatching days, saving you some time and effort during the incubation process.

Tip 2 – The storage of hatching eggs
Store the hatching eggs correctly!
Experience has shown that under certain conditions hatching eggs can be stored for up to 14 days without any problems and without the storage time having a negative effect on the hatching success.
In doing so, you need to consider the following.
Store the eggs on the egg tip.
Create a cool environment protected from sunlight and drafts.
An ambient temperature of 46,4-53,6 °F is optimal during storage.

Tip 3 – Acclimatize the hatching eggs
Eggs should be acclimated before hatching.
This will significantly increase your breeding success.
If you have transported the eggs and they have been exposed to shock, then they should be allowed to rest for 24 hours before incubating them.
The hailstring in the egg then has enough time to “fix” everything.
It is also important that the eggs do not experience temperature differences too far apart in a short period of time.
This means you should never put a 46.4 °F cold egg into an incubator that has already warmed to 99.5 °F.
This will decrease your breeding success.
Allow the hatching eggs to acclimate to room temperature approximately 59-64.4 °F beforehand.
Thus, the rest period after transport can be combined with it quite well.
If you store the delivered eggs for 24 hours on the egg tip in a room with sufficient temperature, you can start hatching immediately the next day!

Tip 4 – The brood temperature
Less is more!
Most hatching eggs of avian species hatch very well at a hatching temperature of 99.5-100 °F.
Here it should be noted that too high incubation temperature can lead to rapid death of embryos.
While a slightly too low temperature usually only leads to prolonged incubation without harming development.
Therefore, you should always place a separate thermometer inside the incubator and not just trust the incubator display.

Tip 5 – The humidity
Sufficient humidity during incubation days and just before as well as during hatching days is important for embryo development and for the hatching process.
Humidity is also important for the development of the air bubble in the egg.
During the incubation process, the contents in the egg evaporate.
If the humidity is too high during the incubation days, the liquid in the egg may not evaporate properly.
As a result, the air bubble would not develop sufficiently throughout the process and the chick would be more likely to drown in during the hatching phase because the air bubble is too small.
Insufficient humidity during the breeding days increases the risk of malformations.
Just before and during the hatching period in an artificial brood, it is important to increase the humidity in the brooder.
This keeps the egg shell softer and makes it easier for the chicks to hatch.
In addition, high humidity during hatching prevents desiccation of the inner eggshell.
If the inside of the eggshell dries out, the chicks may stick to it during hatching.
Wet sponges and cloths, which you can put in the incubator, help to quickly increase the humidity for a short time.
When the first chicks hatch, the humidity in the incubator also increases due to the evaporation of moisture from the destroyed eggs.

Tip 6 – Turning hatching eggs
It usually outweighs the advantage of keeping the incubator closed for the first 2 days before you start turning hatching eggs by hand.
During this period, a constant temperature is more important than turning by hand. However, incubators with automatic turning function can run from day 1 on.
Otherwise, it’s more a matter of faith whether eggs need to be turned for the first 3 days.
However, keep the following in mind.
Since from day 3 the germ begins to develop, it is important to turn the eggs.
This prevents the germ from sticking to the eggshell during development.
3 days before the hatching phase begins, eggs must not be turned.
This is because the chicks begin to dip your beak into the air bubble, switching to lung breathing.
Tip 7 – The shearing of the eggs
Shear the eggs before you hatch them.
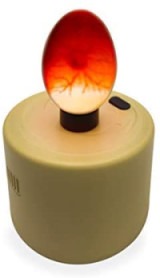
X-raying hatching eggs before you hatch them will tell you if all the eggs are visually okay.
This way you can better find out if some eggs may be damaged on the egg shell by candling them.
Damaged eggs can then be sorted out directly.
Also, only use eggs for hatching where the air bubble is actually on the blunt side of the egg.
If the air bubble is on the side of an egg, then you will most likely not have success hatching with that egg.
View candling lamp on Amazon.com

Tip 8 – Remove dead / unfertilized eggs
Dead and unfertilized hatching eggs should be removed from the incubator as soon as possible!
How to recognize dead hatching eggs during shearing:
Blood ring
The ring of blood during shearing is a sign that the germ in the egg has not developed successfully.
This can be seen, for example, in chicken eggs as early as day 4 of hatching.
Black spot
A dark black spot in the egg is a dead embryo. In this case, the blood of the embryo is pooled (agglomeration).
For example, a black spot can be seen in chicken eggs from day 6.
Dead hatching eggs will rot and pose a danger to the healthy hatching eggs!
Because bacteria and fungi will form.
Be sure to remove dead eggs!

Tip 9 – Secure eggs against twisting
You should secure the eggs against twisting in the incubator.
This is especially important in the hatching phase, when the eggs are lying on the hatching tray.
Because already hatched chicks like to play soccer with the eggs, which have not yet hatched.
This can lead to chicks, which may have already pecked at the egg, suddenly lying on the wrong side and suffocating because another chick has “knocked over” this egg.
Generally, however, this is also critical because chicks dip your beak into the air bladder in the ei a few days before hatching and begin lung breathing.
Twisting here is very dangerous for the chicks.
To prevent this, you can cut rings from the cardboard of kitchen paper or toilet paper.
As an alternative, such a sink liner or similar is also suitable.

Tip 10 – Darken the incubator
This last tip actually refers only to the hatching phase.
Darken the incubator with a towel or similar once hatching has begun.
Why?
This makes the chicks, which are the first to hatch, not so easy to move and active when you have recovered.
Because when hatched chicks have recovered and got enough light, then these run around actively, play with your comrades, which is still in the egg soccer and peck already times gladly.
So if you do not provide light, then the chicks behave noticeably quieter.
Thus, you can prevent damage to the eggs, which have not yet hatched.
In conclusion:
Also use the hatching instructions on this page and the hatching plans to print out.

